Mastering the Aeonblight Drake Battle in Genshin Impact
Conquer Genshin Impact's Aeonblight Drake boss by targeting its glowing weak points, which trigger paralysis and create crucial openings for victory.
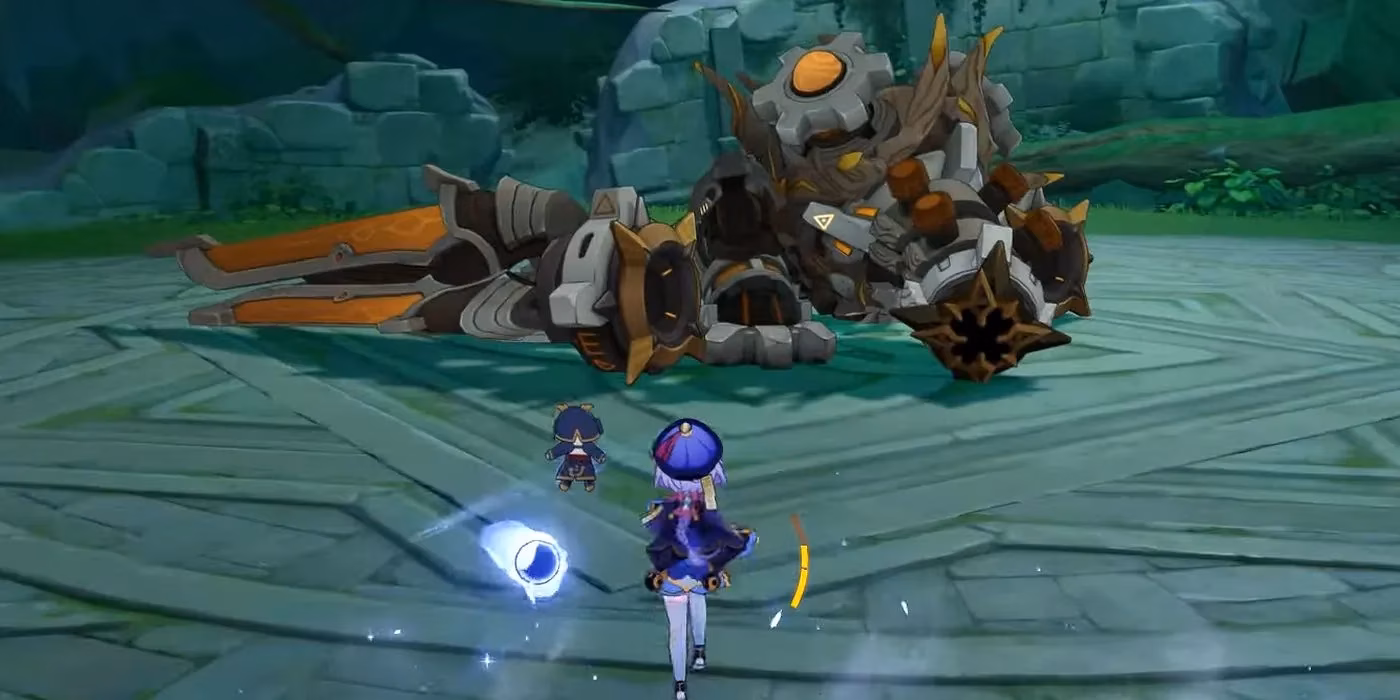
Deep within the cavernous depths of Devantaka Mountain, in Sumeru's Ardravi Valley, lurks one of Genshin Impact's most formidable mechanical beasts. The Aeonblight Drake, a fusion of technological terror and draconic design, awaits challengers brave enough to venture into its underground domain. But what makes this encounter so uniquely challenging, and how can players overcome this seemingly insurmountable foe?
Finding Your Way to the Battle
The journey to confront this mechanical dragon begins at the northern cliffs of Ardravi Valley. Travelers who fast travel to the designated Waypoint will discover a winding cobbled path that descends into a spacious grotto. This ancient pathway, worn smooth by time, leads adventurers deeper into the mountain's heart where the Aeonblight Drake makes its home. The cave system itself tells a story of forgotten civilizations and abandoned technology, setting the stage for an epic confrontation.
Understanding Your Mechanical Adversary
The Aeonblight Drake represents a terrifying evolution in Ruin technology. Unlike its smaller cousins, the Earthguard and Skywatch Ruin Drakes, this Normal Boss combines the capabilities of both ground and aerial combat into a single, devastating package. Veterans who have previously battled the standard Ruin Drakes might recognize some familiar attack patterns, but overconfidence could prove fatal. This mechanical monstrosity brings an entirely new level of complexity to the battlefield, featuring enhanced abilities and devastating new techniques that can overwhelm unprepared adventurers.
But does power alone determine victory? Not necessarily. Despite its imposing presence and formidable arsenal, the Aeonblight Drake shares a critical vulnerability with its lesser counterparts: the glowing cores positioned strategically across its mechanical body. These luminescent weak points flash during combat, serving as both a targeting beacon and an invitation for savvy players to exploit.
The Anatomy of Victory: Weak Points and Vulnerabilities
Precision targeting becomes paramount when facing this mechanical beast. When these cores illuminate during the heat of battle, sharp-eyed archers and ranged attackers must seize the moment. Striking these glowing targets triggers a spectacular cascade effect—the massive drake's systems momentarily overload, causing temporary paralysis that leaves it completely vulnerable to coordinated team assaults.
| Weak Point Location | Effect When Struck | Optimal Attack Window |
|---|---|---|
| Wing-mounted Cores | Full Paralysis | 10-15 seconds |
| Body Core | Temporary Stun | 5-8 seconds |
| Flight Mode Cores | Forced Landing | Immediate |

Phase One: Ground Assault Strategy
The confrontation begins with the Aeonblight Drake in its terrestrial combat mode. During this initial phase, the mechanical behemoth unleashes a relentless barrage of attacks:
-
Devastating ground slams that create shockwaves across the battlefield
-
Powerful tail swipes capable of launching characters across the arena
-
High-speed charging attacks that can pin down careless adventurers
However, experienced players have discovered a remarkable exploit hidden in plain sight. The Drake's impressive size, while intimidating, actually creates a significant blind spot. By positioning themselves directly beneath the base of its mechanical tail—in that sweet spot where the thickest portion meets the body—players can effectively neutralize the majority of its ground-based arsenal. From this strategic position, the drake struggles to land meaningful hits, its massive frame working against its programming.
But what about that tail swipe, you ask? 🤔 This particular attack remains a threat even from the safe zone, but it broadcasts its intention clearly. The mechanical beast winds back its tail in an unmistakable telegraphed motion before executing a full 360-degree spin. Alert players can easily dodge-roll out of danger and immediately return to their safe position beneath the tail base.
Phase Two: Aerial Superiority and Counter-Tactics
After sustaining sufficient damage and generating elemental resistance to the most recently applied element, the Aeonblight Drake dramatically shifts tactics. Its massive wings extend fully as it takes to the air, transforming the battlefield dynamics entirely. This aerial phase represents both the drake's most dangerous and most vulnerable moment.
The Critical Transition
As the mechanical dragon ascends, two prominently glowing cores become visible atop its wings. These targets demand immediate attention from your team's ranged attackers. Whether wielding bows, catalysts, or other long-range weapons, players must focus fire on these luminescent weak points. Successfully destroying both wing cores triggers a catastrophic system failure—the drake plummets to the ground in a spectacular crash, completely defenseless.
This represents your golden opportunity. ✨
During these precious moments of vulnerability, unleash everything in your arsenal:
-
Activate all available Elemental Skills
-
Deploy saved Elemental Bursts for maximum damage
-
Apply elemental reactions for amplified damage numbers
-
Position your main DPS for optimal rotation execution
Team Composition Considerations for 2026
The beauty of this strategy lies in its accessibility. Free-to-play adventurers can successfully execute this approach without requiring limited five-star characters or premium weaponry. However, optimal team composition still matters:
Essential Roles
Primary DPS: Characters with strong sustained damage output
-
Focus on those with rapid attack animations
-
Elemental damage dealers excel during vulnerability windows
Ranged Attacker: Critical for targeting wing cores
-
Bow users provide the most reliable targeting
-
Catalyst users work as effective alternatives
Support/Healer: Survivability remains crucial
-
Shield generators offer protection during dodges
-
Healing ensures team endurance through extended battles
Sub-DPS/Buffer: Maximize damage during openings
-
Elemental reaction enablers
-
Attack buffers for team-wide damage amplification
The Rhythm of Battle: Putting It All Together
Successful encounters follow a predictable yet satisfying rhythm. Begin by positioning beneath the tail's base, chipping away at the drake's health while dodging the occasional tail swipe. When it takes flight, immediately switch to your ranged character and target those glowing wing cores with precision. Once the beast crashes down, that's your cue for an all-out offensive—depleting as much health as possible before it recovers.
Rinse and repeat. Return to your safe spot beneath the tail as it regains its footing, continue your methodical assault, and prepare for the next aerial phase. With proper execution, even casual players can consistently defeat the Aeonblight Drake in just a few minutes with minimal resource consumption. ⚔️
Advanced Tips for Efficient Farming
For adventurers planning to farm this Normal Boss repeatedly in 2026:
-
Energy management: Save Elemental Bursts specifically for vulnerability windows
-
Positioning discipline: Resist the urge to chase—let the drake come to you
-
Pattern recognition: Learn the timing between ground and flight phases
-
Elemental rotation: Plan your elemental application to maximize reaction damage
-
Stamina awareness: Always maintain enough stamina for emergency dodges
Final Thoughts: Triumph Through Strategy
The Aeonblight Drake initially appears as an overwhelming challenge, a mechanical nightmare designed to test even veteran players' skills. Yet, like many encounters in Genshin Impact, knowledge transforms intimidation into opportunity. By understanding its attack patterns, exploiting positional advantages, and executing precise ranged attacks against its critical weak points, adventurers can transform this daunting boss fight into a manageable—even farmable—encounter.
Isn't it remarkable how even the mightiest constructs have their Achilles' heel? The Aeonblight Drake serves as a perfect reminder that in Teyvat, intelligence and strategy often triumph over raw power. Whether you're a seasoned veteran or a newcomer to Sumeru's mysteries, mastering this mechanical dragon represents a satisfying milestone in your adventuring career.
So gather your team, stock up on healing items, and venture into that grotto beneath Devantaka Mountain. The Aeonblight Drake awaits, and with these strategies in hand, victory is well within your grasp. Happy hunting, Travelers! 🎮✨